Pages

Friday 28 January 2011

The Retro Bicycle Post


I nipped out on my bike this morning to buy some fabric from a local haberdasher and instantly wished that I’d worn ear muffs - it was bloody cold. I’m usually quite good with bike attire, in so far as I wear appropriate clothing - I’ve got nasty waterproof trousers and matching amorphous waterproof jacket for when it pours, I always wrap up warm and tend to wear trousers rather than skirts. Earmuffs are a problem though as they muffle traffic noise and I want to be able to hear what’s thundering up behind me.
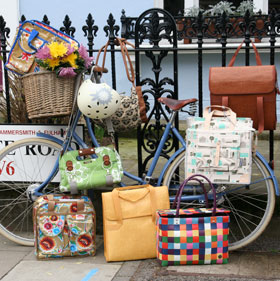
I love my bike - I'm sure you can see why.


It’s a modern version of a vintage classic and generally turns heads when I’m pedalling along and of course there's a ton of accessories I'd love to add - Vintage Schwinn bike enthusiasts take a lookee here.

I can guarantee it’s the bike that causes the interest, not me - there is a dearth of stylish cycling attire out there, especially for Britain’s climate. So imagine my surprise when I walked into a cycle shop in London only to find amongst the inner tubes, a rather beautifully cut swing coat with a nipped in waist and wait for it - detachable hood. See below.
Water Off A Duck's Back, waterproof coat.
The bike shop guy registered my surprise and gave the low down on the coat, a new range by designer Antonia Maybury her company is Water Off a Duck’s Back stylish coats for women who want to look good and stay dry.
This is the answer to the prayer I’ve often muttered - decent cycling outerwear with integral reflective tape. I’ve gone so far as to source reflective tape myself in order to design and make such a jacket.

This mac has a reversible belt, one side reflective - flip up the collar and roll down the cuffs for more of the same. It buttons in such a way as to keep the fabric far from the back wheel. I was too busy to try the coat on that day and the £130 price tag just before Christmas meant I’d have to be content just to drool. But my hat goes off to Antonia, an innovate design and a market gap well and truly exploited - I hope she extends the range.

There is quite a classy range of cycling capes and cycle hats to be found at Cycle Chic Clothing, along with some fancy panniers. 

CycleChic, panniers.
I don’t like to spoil the clean lines of my bike with bulky panniers and simply hang my Mexican made plastic shopper from the handlebars.


Note the wonderful Sunburst front gate which I bought online last year. I’ve had a long love affair with Beach Cruiser bikes ever since I saw Pee Wee’s Big Adventure many moons ago. These are two from my stable that I’ve since said farewell to - one stolen, one sold on to an enthusiastic Cruiser newbie. 


For the ultimate in cycling in style - and heels - check out this lady whose blog I’ve followed for quite a while as she cycles around NY on her pink Hello Kitty bike. Sheryl’s blog is a fitness and weight loss blog - not something I aspire to - I simply got hooked on her ballsy attitude to cycling alongside lycra clones whilst wearing fishnets and corsets!


So back to my earlier bike trip to purchase fabric, I bought some blue check suiting which is pre-washing as I type. This is what I’m going to make - and yes I hope to cycle in them, watch this space!


(NB: I had a really glitchy time composing this post, Blogger wouldn't give me consistent font size or let me delete white spaces. Hope it looks OK on your browser!)

Wednesday 12 January 2011

Greetings Card Trinket Box - Handsewn


Things flash by me on the web as I’m surfing and I neglect to bookmark them - so it was with the greetings cards box … or vintage card box, handsewn Victorian greetings card box, crocheted card box … and all the other searches I made. 
As the memory of the kind of boxes I’d seen and handled at Vintage fairs lingered, how best to describe them eluded me. 

Then I found it!

Then more and more popped up on various web pages - and I was determined to try and make one. Impatient as I am I didn’t download instructions, how hard could it be? And then I realised that the nicest boxes weren’t just blanket stitched around the edge - they were crocheted. 

Hmm - as a rule I don’t crochet. 

But I have been to a class and I do have some books and some hooks. I’d give it a go.

They are variously described as Victorian boxes as I’m guessing they were a popular craft pastime at the time. And still popular now - how about this dinky cup and saucer in the same method from the blog Tea With Friends - fabulous!


I stumbled across one crafter who seemed to have mastered the art ...


... and you can see the truly wonderful work on her blog (check out her tea cosies). She also gives quite a comprehensive tutorial for making these boxes, which I was able to follow - so thank you Blogosphere.

I made a mock up first in plain card to see if I could get the pattern shape right. I had wanted to make a hexagonal box - my primary school geometry came in handy, but the sides were too shallow and the card too flimsy and I ended up with a rather squat wonky affair. 
So I went ahead with a square box for my first attempt. It was the memory of the rounded sides that had stayed with me so it was important I curved the sides of my template.


I had plenty of old greetings cards and postcards to choose from and I would probably double back the cards if made another one so that the inside of the box would be as decorative. There is something nice about capturing the handwritten messages on the interior - one card I used was from my daughter who had written the lyrics to ‘You are my sunshine, my only sunshine..’ inside. 
A lovely reminder as I open the box!


Next I punched holes around all the edges then began to crochet. Suffice it to say I finally got the hang of crocheting two stitches (chains?) into a hole, then an extra chain to take me to the neighbouring hole, and three chains in the corners - crocheters out there, feel free to correct my jargon.


Note I was in desperate need of a manicure.


Once all the cards were edged I sewed them together being careful to get the images the right way up, adding a tassel to the lid for extra pomp!


Ta da! 


I've made more 'sides' than I've actually used so may make another, they're quite quick to put together now I've got the hang of it.


Wednesday 5 January 2011

Red Deco Alcove - With Poinsettia


I finally got around to decorating the alcove in my bedroom this week. The room isn’t big and I like the airiness of neutral colours on the walls, but look what I found on eBay last year - these are the listing photos from the auction.

 the actual dresser is much darker in situ, here with mirror removed ...


... and it needs showing off. In order to do this I decided to create a little Deco nook of colour on one wall, a sort of sumptuous boudoir corner in contrast to the modernist décor in the rest of the room. Do take a look at my stained glass bedroom door which I blogged about here in an earlier post.


I am a sleeves rolled up and go for it type of dame and I love hanging wallpaper. My efforts don’t take close inspection, I’m far too eager to get the stuff on the walls to hold a plumb line or a spirit level to it - I think this comes from having done Theatre Design work where the overall ‘look’ can outweigh perfectionism (I have been known to gaffer tape curtain hems…).


This paper ‘Moulin Rouge’ from B&Q (cheap and cheerful) behaved itself and went up brilliantly - no stretching or snagging, the corner was completed in under two hours with coffee breaks.

Now my little Deco chest of drawers looks really at home and I use it to display my paper ephemera and postcards (so many vintage retailers and club nights are producing wonderful postcards these days). I had a piece of glass cut to size from a local glaziers to cover the rather scuffed drawer top then found some backing for my collage from my paper stash. I have a ‘stash’ for most things…


Very soon the collaged pictures, limed oak and bakelite handles will be obscured by hair products and various cosmeticy bits and bobs - but she looks real classy for now.


And to top if off, how about the kitschiest cheesecake chalk-ware lamp ever, which I found on eBay. 


This one arrived intact unlike the Geisha lamp I bought which arrived smashed, a restore project I will gladly blog when I work out exactly how best to mend it! Any chalk-ware restoration tips anyone?

Saturday 1 January 2011

New Year Post!

Happy New Year!
Start as you mean to go on I say, so - more knitting, sewing, sticking, baking. Actions speak louder than mumbled resolutions too so the first thing I did this morning was to bake some delicious breakfast muffins which filled the house with the aroma of cinnamon and nutmeg. 
These are Nigella’s Christmas muffins and I had wanted to bake them for Christmas morning but that never happened..


Next I headed out to my making space - the large tin box in the garden - and gave it a good sweep out to the strains of Cab Calloway. And a second breakfast muffin (they are moreish).


I’m using up some wool from the stash to make a small wrist bag from a vintage pattern. I’m a slow knitter and this will probably be ready by next Christmas, but the act of knitting I find very useful as ‘mulling time’ where ideas drift about in one part of my brain whilst another part worries over sl1 p2 k2 yadda yadda..

I’ve also been inspired by so many other people’s making blogs in the past year and I’m always desperate to try new projects. Victorian style greetings card boxes are my current obsession and I’ll blog the whole process once I’ve completed a box that ‘works’ - I’m finding it quite tricky to get the pattern shape right, it’s trial and error … and I have the patience of a gnat.


So here’s to plenty more Making It Up in 2011 and I hope to get to some more practical workshops this year. I’ll also be posting the occasional series of ‘Look What I Found On eBay / Etsy / Car Boot’, starting with…

Vintage Bakelite 3D View-master (model E)


I had one of these as a girl - a grey plastic version and only a handful of ‘picture wheels’. I can remember the day when I finally got how to view the pictures in 3D and it was amazing! Apollo rockets hung in star scattered blackness, Mickey Mouse loomed over a child in Disneyland, the Parthenon’s pillars stood out bold against an impossibly blue sky.


The best wheel I got with this vintage model is Flowers of Hawaii - I still find the spooky stillness of the images awesome. If you’ve never held a View-master, go out and try one now - beats Avatar hands down (ahem..).

Related Posts Plugin for WordPress, Blogger...