Pages

Friday, 4 October 2013

Quick Make - Folk Art Toilet Sign

I started out with a hunk of floorboard I found in the bin and some buttons (natch).


I painted the wood in Farrow and Ball, sanded it back when it was dry and highlighted the edges by 'dry brushing' some gold paint across the woodgrain.


I decoupaged the male and female symbols with decorators PVA and glued the button dividing line in place.


Tada!

I am posting this on the Handmade Monday Linky Party - pop over and see what other people are making this week.

Monday, 23 September 2013

Loo Makeover and Utility Footstool


I have been busy in the Button Shop at Red Door sorting stash and checking the sewing machine is running - CHECK

Next 

I turned my attention to the toilet facilities which although freshly painted, are a little bare. It was decided that the Loo would become the Red Door Hall Of Fame so that once 'seated and relaxed' there would be a wealth of stuff to look at!
This is where the old flyers, posters and inspirational paper ephemera will end up - so if you've gigged at Red Door or had an exhibition, you may may be preserved on the walls.

I lined up a few posters to get me started ...


... then simply went at it with the wallpaper paste.


There's still plenty of room for updates too.

Now 

I've turned my attention to the furniture stash - quite a few chairs will be sanded and painted RED by Johnny the Red Door Handyguy, to be used at the studio for events.


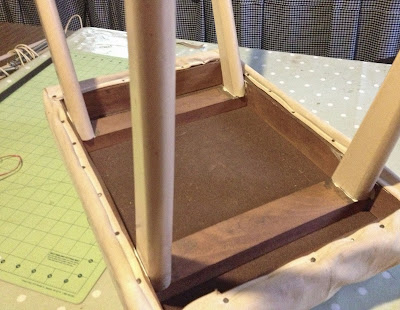
Other chairs I hope re-paint and re-cover and I'm starting small by tackling this humble Utility Stool first.


From wiki - Utility Furniture refers to furniture produced in the United Kingdom during and just after World War II, under a Government scheme which was designed to cope with shortages of raw materials and rationing of consumption. Introduced in 1942, the Utility Furniture Scheme continued into post-war austerity and lasted until 1952.

How do I know it's a Utility stool? It had this symbol stamped on the underside (and I didn't photograph it!)


Here she is with the baggy old furnishing fabric removed and the legs sanded and painted with stashed F&B match pots. 

Yes one leg is grey. 

No it's not an undercoat. 

Bear with me.


An interesting fact I learned on my Goodlife Centre course (see previous post) is that match pots contain pigment and carrier only - no 'fixative' or 'varnish' so the legs will have to be sealed with a matt varnish when it's done.

It is my intention as Red Door Craft Wrangler to try and use stashed or thrifted materials wherever possible, so this week I'll look for a chunk of foam and some upholstery fabric to make the stool beautiful once more. 

Finally

My digging unearthed this lovely square of timber.


Guess what I'm going to make from it?

Saturday, 14 September 2013

Good Times at the Goodlife Centre - Furniture Painting


If you’ve ever wanted to know how to turn a battered old chair into something worth sitting on and beautiful to look at, you’d do well to truck on down to The Goodlife Centre near Waterloo.


With my newly acquired title of Craft Wrangler at Red Door, I thought it best I ‘skill up’ and get some woodworking techniques under my belt. I was so impressed with the Goodlife Centre website and the courses on offer that I booked myself onto their ‘Furniture Painting Techniques’ course. But I was happily spoilt for choice as they have a variety of classes covering basic woodworking techniques, hand caning, DIY in a day and even basic electrics. 

This is not your regular crafting with cupcakes scenario, nor is it a boys-own fest of macho hobbyists – it is the wonderful happy medium of grown up classes covering really useful skills.


The venue itself is great – not huge, but big enough to accommodate a class of ten or so, with a nicely furnished chill out area near the front door and a second smaller workshop room. Even the toilet facilities have been thoughtfully furnished. The Goodlife is as good as its word, it’s a very positive place with a quirky DIY vibe – I liked it a lot.


Our host at the Centre was Alison who has an eclectic array of design skills and the Centre is styled and equipped to be the workshop of Alison’s dreams.
Besides creating beautiful objects at the Centre Alison also leads workshops, but for this class our tutor was Rebecca, a fully qualified painter and decorator with years of experience.


The great thing about this course (and all other courses at the Centre I suspect) is its hands-on practical approach – we were striping, sanding, priming and painting real bits of furniture and making real messes with real products. 


The theory and products were explained clearly by Rebecca and we were encouraged to experiment with own samples such techniques as distressing, decoupage and graining along with skilful painting and the general approach to ‘sizing up’ a piece of furniture prior to sloshing paint on it – what does the piece say to you, how best to adapt it, might it be better left unpainted?


My only criticism is given the amount of techniques to hand and taking preparation and drying time in account, the day felt a little crammed – Alison and Rebecca are keen to impart so much knowledge. 

I wanted to know so much about the Centre itself and the nature of Alison’s ‘sustainable ethos’ that I rather guiltily hung around at the end of the session as they cleaned up in order to fire a few questions.


I would find it quite an expensive undertaking to complete more than a couple of courses a year sadly – they don’t come cheap - but this is understandable given the expertise of the tutors and the variety and quality of the sessions. 

And I learned lots ...

Related Posts Plugin for WordPress, Blogger...